Vehicle Design for Concept Art: Thumbnails to Blueprint (Side View First)
Vehicle design is industrial character design: silhouette clarity plus functional logic. The best vehicle concepts communicate role, scale, and engineering believability even before you render materials.
This guide teaches a production workflow used by concept artists:
- ideation thumbnails that generate options fast
- the side view blueprint method (industry standard)
- wheel/weight logic (believability shortcut)
- projecting to orthos for 3D-ready reference
1. Start With Role, Not Cool Shapes
Answer these first:
- Who uses it? (military, courier, farmers, pirates)
- Where does it operate? (desert, snow, city, space)
- What does it do? (haul, race, fight, explore)
Role → design consequences
- Desert: dust filters, high clearance, heat shielding
- Snow: wide tires/tracks, insulation, covered intakes
- City: visibility, tight turning radius, compact form
- Military: armor zones, redundancy, modular attachments
Pro rule: every form should justify a purpose.
2. Thumbnailing Vehicles (Fast and Useful)
Vehicle thumbnails aren’t pretty sketches. They’re silhouette tests.
The 20 thumbnail system
- 20 small side silhouettes
- 2–3 minutes per silhouette
- focus on cabin + chassis mass + stance
What to vary on purpose
- wheel size and placement
- cabin position (forward/mid/rear)
- ground clearance
- silhouette hook (fin, cargo pod, engine hump)
Pro tip: avoid making every design symmetrical. Add one asymmetrical element for identity.
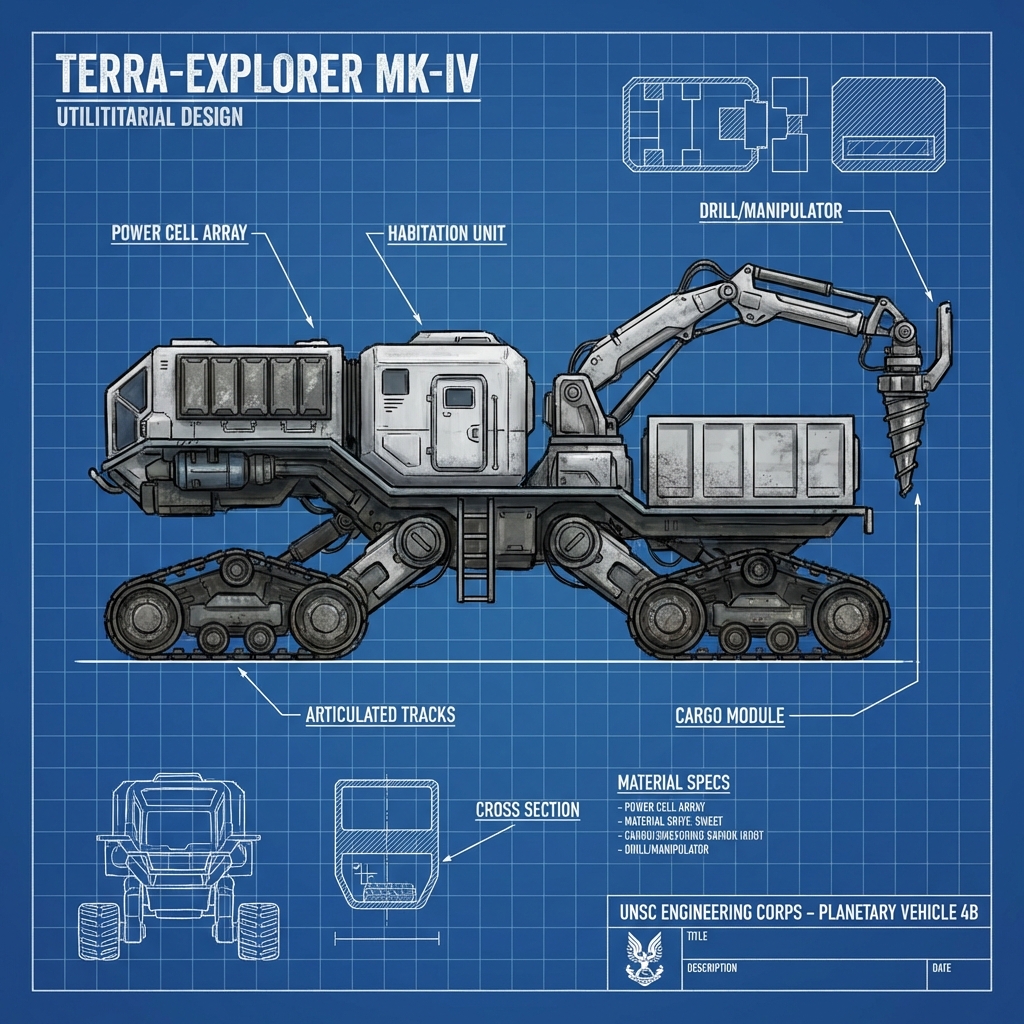
3. Side View First (Blueprint Thinking)
Most vehicles are best defined in profile.
Blueprint workflow
- Draw a ground line.
- Block in big masses:
- cabin volume
- engine/motor volume
- cargo volume
- Place wheels/landing gear.
- Refine stance and proportions.
- Add medium forms:
- doors, fenders, intakes, panels
- Add small details last.
Why side view works: it locks proportions before perspective distortions hide mistakes.
4. Wheelbase and Weight Logic (Believability Shortcut)
A vehicle feels fake when weight and support don’t match.
Quick believability checks
- Wheels should align under major mass.
- Heavy rear cargo needs rear support.
- Long vehicles need longer wheelbase for stability.
- High speed vehicles have lower center of gravity.
If the cabin is forward-heavy: front suspension must be chunky or reinforced.
5. Big–Medium–Small (BMS) for Vehicles
Avoid Lego-brick uniformity.
- Big: cabin + chassis silhouette
- Medium: doors, fenders, engine pods
- Small: bolts, vents, decals, cables
The 70/30 rest rule
Keep large areas clean; cluster detail where it’s functional:
- near doors and access hatches
- around engines and vents
- around maintenance panels
6. Project to Orthos (Front/Top) Without Guessing
Once your side view is strong, project it.
Projection method
- Mark key heights (roof, window line, wheel center).
- Draw vertical guides.
- Build front view using width decisions.
- Build top view from roof/cargo silhouette.
Pro tip: label dimensions (door height, wheel diameter). This makes Blender blockout faster later.
7. Add Story: The 3 Vehicle Details That Matter
Choose 3 high-impact narrative elements:
- Identity: logo, faction marking, number
- Function: tool mounts, cargo straps, sensors
- History: dust streaks, repaired panel, impact scar
This makes the vehicle feel owned and used.
Exercises
- 20 thumbnails for “desert courier vehicle.”
- Pick 3 → blueprint side view.
- Pick 1 → front view projection.
Next and Previous
- Previous: Sci-Fi Trim Sheets in Blender: UV-First Modeling for Infinite Panel Detail
- Next: Vehicle Design in Blender: Blockout, Scale, Camera Lenses, and Paintover-Ready Renders