Sketching for Production: Thinking Before 3D
Sketching isn’t just tradition—it’s efficient problem-solving. When you skip sketching and jump straight into 3D, you risk wasting hours moving vertices around without a clear plan.
This guide will teach you how to quickly generate, test, and communicate design ideas on paper (or tablet) before Blender even opens.
1. What is Production Sketching?
Production sketches solve design problems, not rendering challenges.
Purpose:
- Clarify proportions
- Explore silhouette and gesture
- Define mechanics and material zones
It’s not: Rendering armor scratches or perfect lighting.
2. Orthographic Sketching for Function
Orthos are flat views: Front, Side, Top. They prevent perspective distortion and guide 3D artists.
Steps:
- Sketch Side View first (it carries the silhouette)
- Project heights across Top and Front Views
- Keep consistent spacing, align key features
- Label materials or moveable parts (e.g., “Carbon panels”, “Rotates 90°”)
Usage: Use these sketches directly as image planes in Blender’s camera view.
3. Drawing Through Forms
Seeing the whole form—even hidden parts—builds solid mental models.
Technique:
- Draw back lines lightly (X-ray view)
- Visualize cylinders, boxes in 3D space
- Use centerlines and cross-contours to show rotation and tilt
Why: It prevents flat, symbolic drawing. It trains your 3D design brain.
4. Thumbnailing for Variation
Early-stage sketching should be fast and messy.
Method:
- Use a small canvas (2–3 inches wide)
- 8–12 variations of the same idea
- No detail—just shape and motion
Evaluate: Pick the most promising 1–2 silhouettes. Ask “Would I want to explore this in 3D?”
5. The Hybrid Sketching Approach
Leverage 3D blockouts without losing sketch energy.
Steps:
- Build a quick blockout in Blender (10–15 min max)
- Screenshot it, drop into Photoshop or Procreate
- Lower opacity, sketch directly over it
- Push design changes while retaining perspective accuracy
Bonus: You can re-use the blockout as a base mesh later.
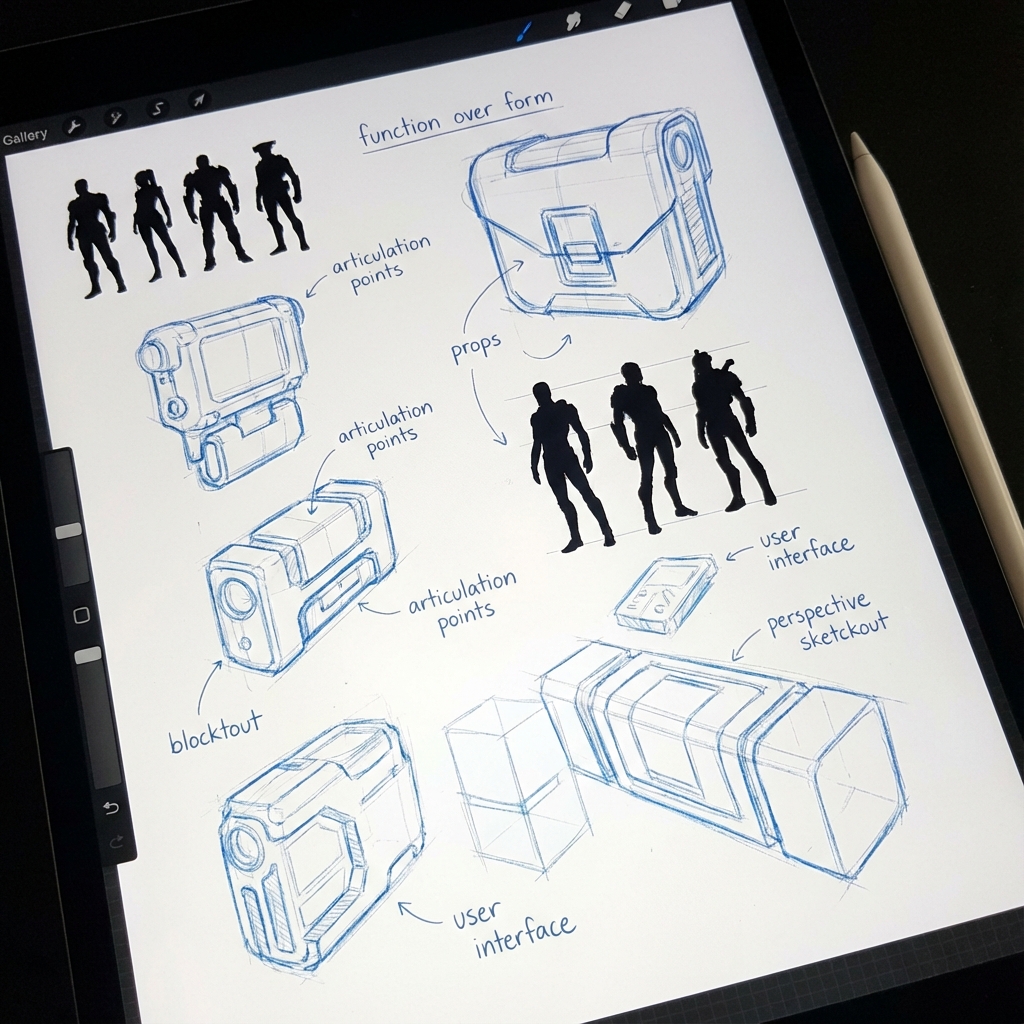
6. Annotations and Function Notes
Use arrows, notes, and overlays to explain mechanics.
Examples:
- “Pistons retract for impact absorption”
- “Ammo loads from bottom hatch”
Why: Helps Art Directors or modelers understand how your design operates.
7. Tools and Best Practices
- Software: Photoshop, Krita, Procreate, or even pencil + paper
- Brushes: Use simple round brush or pencil brush with pressure opacity
- Canvas Size: Start small (1500x1500px), zoom out often
- Naming: Label each version or variation (e.g., V01, V02…)
Conclusion
Sketching is thinking. A strong concept starts as a silhouette, grows into function, and finally becomes 3D. Don’t skip this phase—master it. It’s your fastest path to better designs and smarter production choices.
Next and Previous
- Previous: Mastering Photobash Integration: Beyond “Soft Light”
- Next: Breaking the CG Look: Pro Paintover Workflow in Photoshop (Smudge, Mixer Brush, Grain, Edge Control)