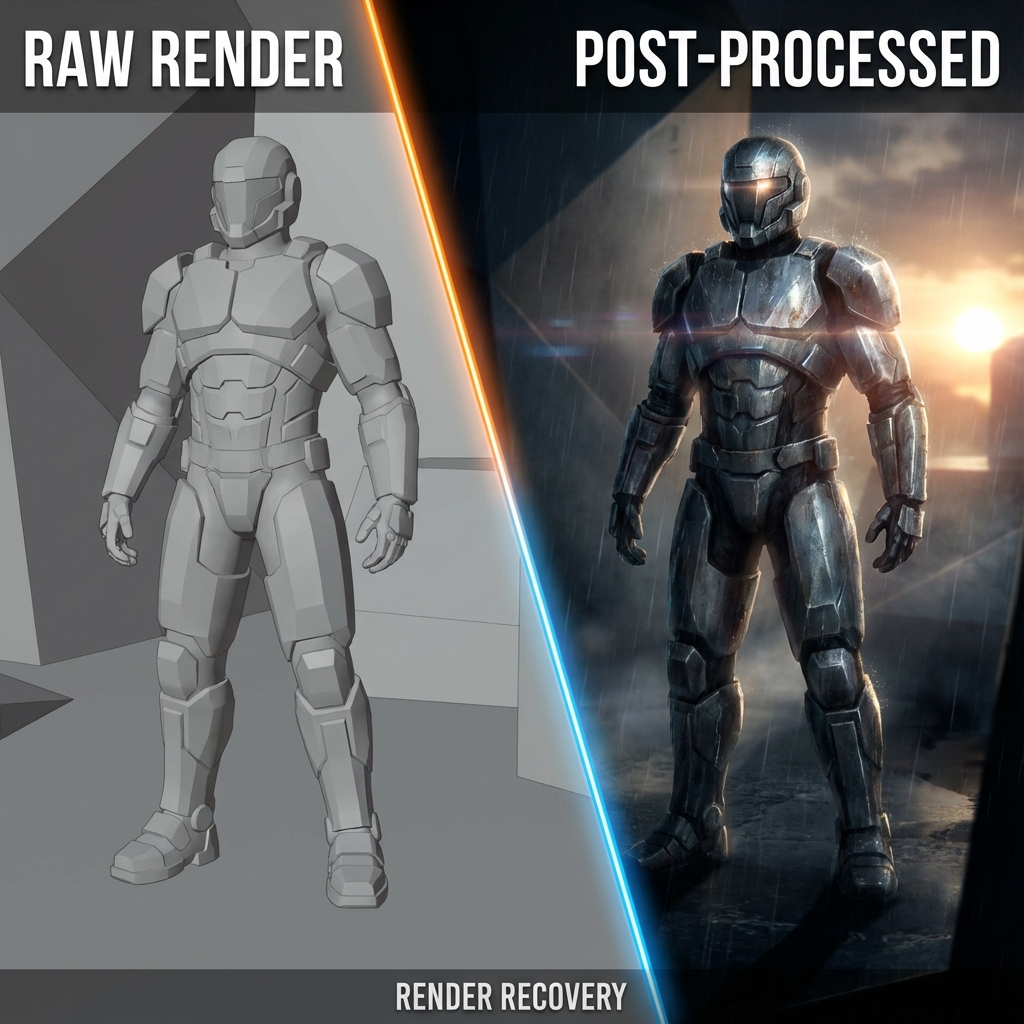
Render Recovery in Photoshop: Fix Lighting, Pose, Materials, and Composition Without Re-Rendering
We’ve all hit render and felt immediate regret: the pose is stiff, lighting is flat, and everything reads like toy plastic. Before you lose another day in Blender, learn the professional truth:
Most “bad renders” can be salvaged in post—if you know what to fix first.
This guide is a triage workflow: how to rescue a render into a concept-art-ready image using Photoshop.
0. The Decision: Fix in Post or Re-Render?
Fix in post if…
- composition is close
- camera angle is good
- you need mood/polish more than geometry
Re-render if…
- the camera is wrong
- major silhouette proportions are wrong
- key forms are missing and must be physically correct
Pro guideline: if the fix is mostly 2D (values, edges, mood) → stay in Photoshop.
1. Triage Order: What to Fix First (20-Minute Rescue)
- Readability: silhouette + focal point
- Values: contrast and separation
- Lighting direction: clarify key vs fill
- Edges: kill razor sharpness
- Materials: break plastic specular
- Atmosphere: depth haze and grading
If you do these in order, you can turn “bad” into “usable” fast.
2. Silhouette and Gesture Fix: Liquify “Nudge”
3D poses are rigid. Concept art often needs exaggeration.
Liquify workflow
Filter > Liquify- Use a large brush and nudge the silhouette:
- open negative space (elbows away from torso)
- exaggerate perspective (pull a hand closer)
- add wind flow to capes/hair (fake cloth)
Pro tip: Make small changes, then toggle preview. You’re aiming for clearer shape language, not a new anatomy.
3. Value Rescue: Make the Image Read
A render can fail purely because everything sits at the same midtone.
Fast value fixes
- Add a
Curvesadjustment:- increase contrast near the focal point
- compress contrast in the background
- Use a large soft brush on a new layer:
- Multiply to deepen shadow group
- Screen to lift haze/light group
Concept rule: background contrast is usually lower than focal contrast.
4. Fix Flat Lighting Without Re-Rendering
If your render has “even light everywhere,” you must create hierarchy.
Paint a new key light
- Create a new layer set to Soft Light.
- Paint warm light onto planes facing the key direction.
- Create a Multiply layer for cast shadow suggestions.
Add a rim light (fast separation)
- Use a thin soft brush on Linear Dodge (Add).
- Place rim selectively on the silhouette edge.
5. Break the Plastic Specular (Material Recovery)
CG plastic often comes from perfect, uniform highlights.
5.1 Highlight breakup
- New layer: Overlay
- Use grunge brush / fingerprint texture
- Paint softly over highlight zones
5.2 Roughness fake (no render pass needed)
- Duplicate the render
Filter > Noise > Add Noise (1–3%, monochromatic)- Mask noise into midtones and highlights
Result: micro-variation makes metal feel worn and skin feel alive.
6. Edge Integration: The “Render Giveaway” Fix
Razor edges scream 3D.
Mixer Brush edge treatment
- Mixer Brush with
Sample All Layers: ON - Pull background color slightly into subject
- Pull subject color slightly outward
Micro-blur for optical realism
- Duplicate flattened layer
Gaussian Blur (0.3–0.8px)- Mask blur mostly into background and secondary forms
7. Color and Shadow Grading (Make Shadows Cinematic)
Many renders have neutral grey shadows.
Shadow color grade method
Selective Coloradjustment- Target Blacks and Neutrals:
- add Cyan/Blue
- reduce Yellow
This simulates skylight fill and instantly feels more photographic.
8. “If I Had Passes” Bonus (Use If Available)
If you exported extra passes from Blender:
- AO: Multiply 10–40%
- Mist/Z-depth: fog and depth grading
- Shadow pass: emphasize grounding
Even one AO pass can save hours.
Exercises
- Take a mediocre render and do a 20-minute rescue using only:
- Curves
- Liquify
- one overlay texture
- grain
- Compare before/after at thumbnail size.
Next and Previous
- Previous: Breaking the CG Look: Pro Paintover Workflow in Photoshop (Smudge, Mixer Brush, Grain, Edge Control)
- Next: Production Sketching Thumbnails: The “Idea Vomit” Workflow for Fast Concept Design