Character Design: From Silhouette to Story
Character design isn’t just about how cool someone looks—it’s about how clear and purposeful they appear to the audience at a glance. Before we dive into armor plates, leather seams, or the trim on a wizard’s robe, we must address shape, function, and narrative.
This guide offers a foundational-to-advanced overview of designing readable, believable, and iconic characters using silhouette theory, shape language, gesture design, and narrative anchoring.
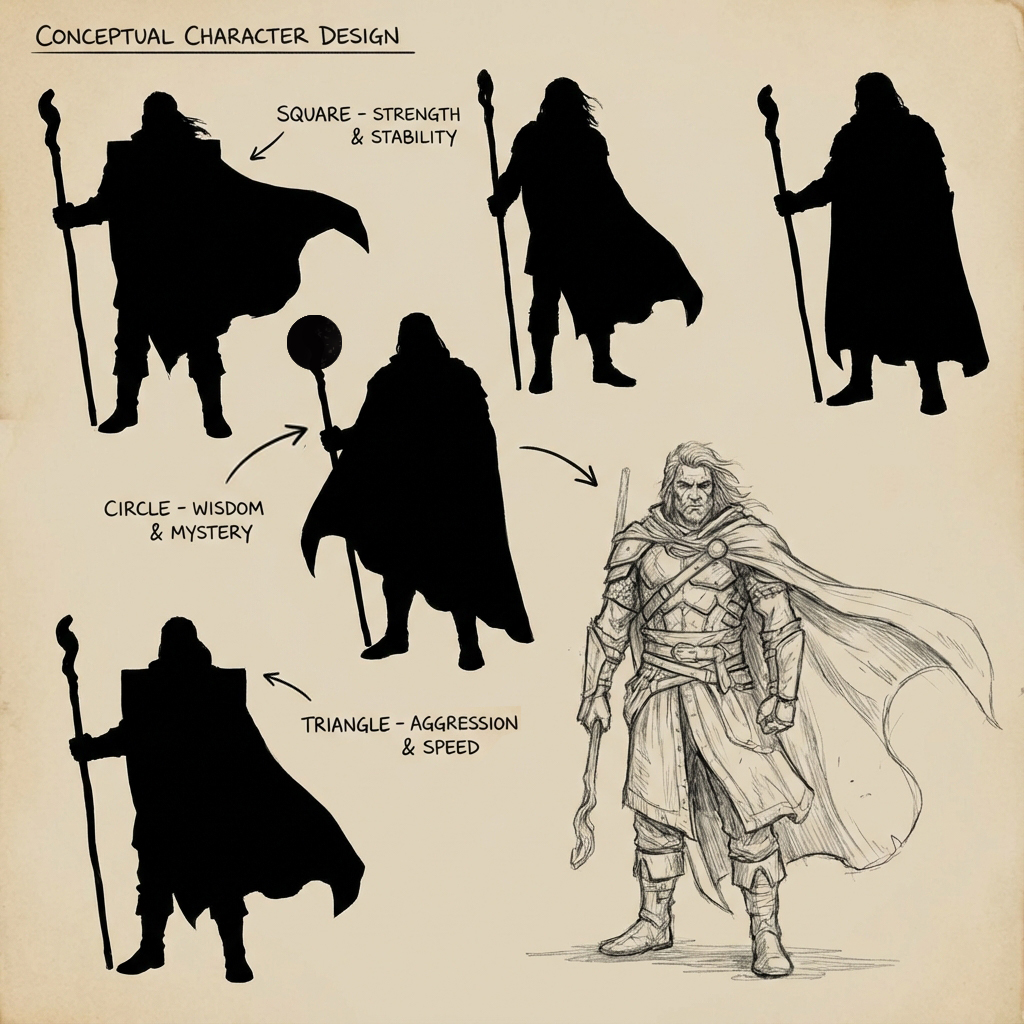
1. The “Big Black Shape” Method
The silhouette is your first pass at designing a character—not the final render. By starting with solid black shapes, you’re focusing on form, proportion, gesture, and negative space.
The Yona Saura Rule
Yona Saura, a seasoned character artist, teaches: “If the silhouette reads, it works.” If the character still feels unique and expressive without any internal detail, it’s a strong design.
Workflow: Lasso Fill Silhouettes
- Use the Lasso Tool (L) in Polygon mode.
- Draw bold shapes without worrying about anatomy.
- Fill with black (
Alt + Delete/Option + Delete). - Repeat with slight variations to find balance.
Tips:
- Focus on gesture first—establish a curve of the spine or a lean.
- Introduce “gaps” or negative spaces—between the arms and torso or legs and cloak.
- Don’t noodle details. Think of action figures or chess pieces.
2. Understanding Shape Language
Every shape communicates emotion and function. Great character design uses these psychological cues to guide perception.
| Shape | Conveys | Example Characters |
|---|---|---|
| Circle | Softness, Innocence | Baymax, Olaf |
| Square | Strength, Solidity | The Hulk, Kingpin |
| Triangle | Aggression, Instability | Maleficent, Starscream |
Advanced Tip: Blend multiple shape languages. A “Gentle Giant” may use a square body with circular features (like hands or eyes) to imply physical strength but emotional softness.
3. Narrative Anchors: Design with Context
Characters must feel like they belong to a world. The more details you derive from their story, the less random your design choices become.
Narrative Checklist
- What is their job or role? (Combat, stealth, diplomacy?)
- What’s their world or culture? (Post-apocalyptic, arctic tribe, futuristic colony?)
- What’s their backstory? (Veteran warrior? Escaped lab experiment?)
Apply This Visually:
- Occupation: A scout wears light armor and binoculars. A field engineer carries tools and utility pouches.
- Environment: A desert nomad uses layered, breathable wraps. A deep-sea diver has padded pressurized gear.
- History: Add asymmetric damage, custom patches, or personal trinkets to suggest past experience.
4. Gesture and Attitude: 30-Second Thumbnail Drill
Gesture matters more than detail when establishing identity and personality.
Exercise: Rapid Pose Silhouettes
- Set a 30-second timer.
- Use a thick brush (no opacity pressure) to block out silhouettes.
- Focus on weight distribution, spine curve, head tilt.
- Don’t stop to refine. Capture attitude.
Repeat this 20 times. Choose your favorite 2–3 and refine them further.
Why it Works:
- You avoid overthinking.
- You capture personality through body language.
- You explore extreme poses you might not have planned.
5. Internal Contrast and Value Blocking
Once silhouette and gesture are locked, internal contrast guides the eye and builds hierarchy.
The Rule of Threes
Use three primary value zones to balance contrast:
- Dark Base (60%) – boots, gloves, under-armor.
- Mid-Tone Midsection (30%) – torso, jacket, armor plate.
- Light Accent (10%) – skin, face, energy source.
Focal Point Strategy
- Push contrast where the eye should land—often the face.
- Use overlapping values: e.g., light face framed by dark hood.
- Keep edges elsewhere soft and less contrasty to avoid distraction.
Bonus: Texture Zones
- Reserve high-frequency textures (dirt, scratches) for secondary reads.
- Use clean, smooth surfaces near the focal point to maintain readability.
6. Bonus Tools and Plugins
- Photoshop Brush Packs: Use hard round brushes for clean edges, but supplement with texture brushes (e.g., hair, cloth weave, metal scratch).
- PureRef: Keep your references (costume, anatomy, fabric) in a floating window.
- DesignDoll or Posemaniacs: Poseable 3D mannequins for gesture reference.
Conclusion
Character design starts with impact and ends with story. By anchoring your design to readable silhouettes, expressive gestures, clear shape languages, and thoughtful narrative clues, you’ll craft designs that don’t just look cool—but feel alive and intentional.
Don’t draw the costume. Draw the character. Then let the costume serve them.
Coming up next: Using 3D blockouts for costume layout and paintover techniques to finalize character renders.
Next and Previous
- Previous: Creature Rendering for Concept Art: Fur, Scales, Wet Skin, and Material Hierarchy
- Next: Painting Skin for Concept Art: SSS, Facial Color Zones, and Realistic Specular Control