Creature Rendering for Concept Art: Fur, Scales, Wet Skin, and Material Hierarchy
Great creature renders aren’t “detailed everywhere.” They’re designed reads: controlled values, smart edges, and deliberate texture frequency. The goal is to make the creature feel tangible without drowning it in noise.
This guide covers high-demand creature finishing:
- material hierarchy (what dominates?)
- texture frequency and clustering
- fur/scales/wet skin workflows
- believable eyes, mouths, and focal control
- paintover polish stacks that unify everything
1. Material Hierarchy (Pick a Primary Surface Story)
Creatures often fail because every surface is equally complex.
Choose your primary read:
- dry leathery skin (matte, tough)
- wet amphibian (tight specular, darker midtones)
- fur + exposed skin (rim light hero)
- scales + plates (hard specular breaks)
Then use secondary surfaces to support the primary.
2. Texture Frequency Control (The Pro Rendering Secret)
Think in three frequencies:
- Large: value masses + lighting shapes
- Medium: folds, plates, pattern groupings
- Small: pores, micro scratches, tiny scales
Where small texture should live
- around the head/face (focal zone)
- around weapons/limbs if they are story points
Where small texture should NOT live
- everywhere equally
- deep shadows (it turns to noise)
Pro trick: keep backgrounds and far limbs simpler so the head reads.
3. Edge Strategy (Lost-and-Found for Creatures)
Edges sell realism more than texture.
- Found edges: focal point, lit plane breaks
- Lost edges: shadow, atmospheric blend, secondary limbs
Fast Photoshop edge workflow
- Smudge with a textured brush at 30–60% on non-focal edges.
- Sharpen focal edges with a smaller hard brush.
Rule: edges guide attention.
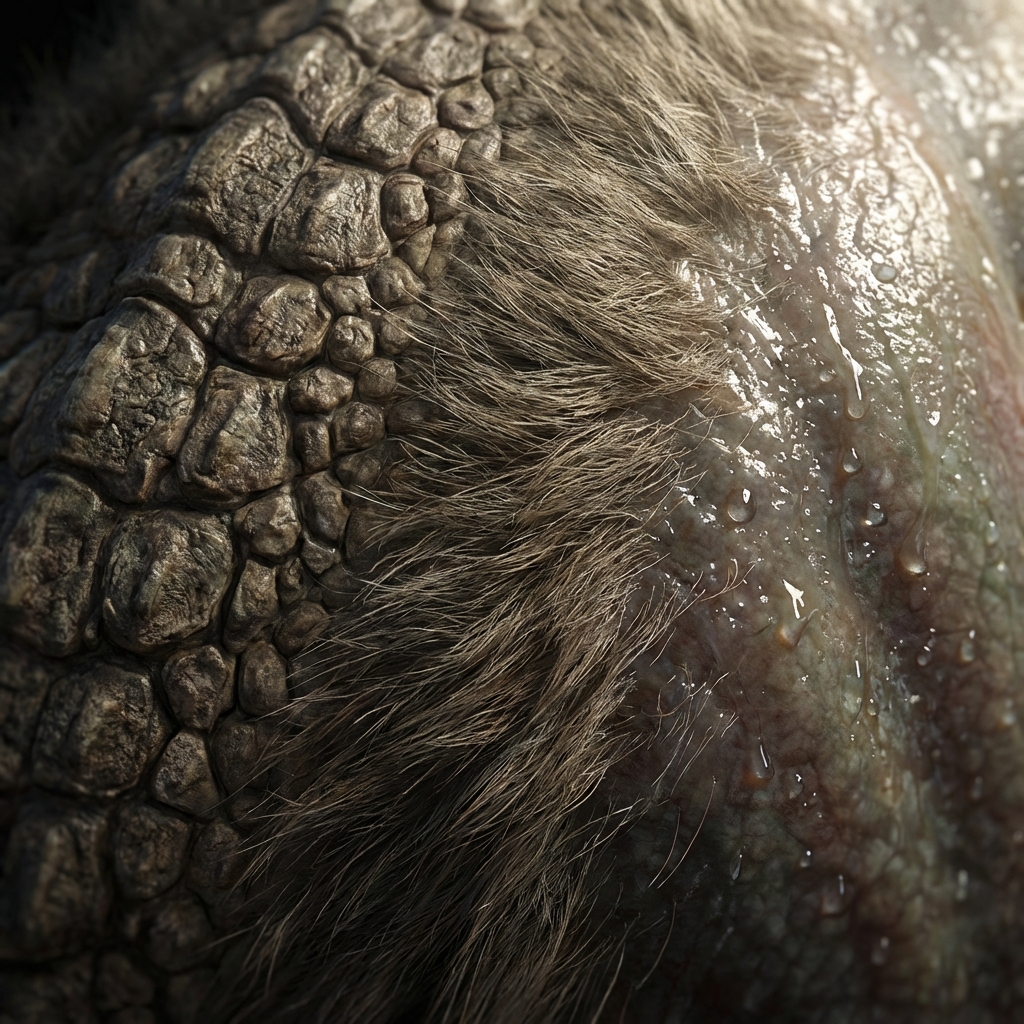
4. Fur Workflow (Readable, Not Hair-by-Hair)
The fastest believable fur is clumps + direction.
Fur rendering steps
- Block values first (fur is still a form).
- Indicate fur flow direction with medium strokes.
- Add clumps in light areas (not in deepest shadows).
- Use rim light to “sparkle” fur edges.
Fur mistakes
- drawing every hair (looks like grass)
- random direction (destroys form)
5. Scales and Plates (Avoid Wallpaper)
Scales become boring if they are uniform.
Make scales believable
- vary scale size across body
- cluster heavy plating on shoulders/spine
- simplify belly and inner limbs
- break rhythm with scars/missing plates
Paint trick
- paint scale groups as bands first
- only indicate individual scales near focal zones
6. Wet Skin / Slime / Amphibian Read
Wet materials have:
- brighter, tighter specular
- sharper highlight edge transitions
- deeper midtones (wet surfaces darken)
Quick wet pass
- New layer: Linear Dodge (Add)
- Paint tight highlights where light hits directly.
- Add a softer bloom around them.
Pro tip: wet reads are mostly about specular shape, not color.
7. Eyes and Mouths (The Creature’s “Human Connection”)
Viewers look for faces.
Eyes
- keep values clean
- add a crisp catchlight (tiny and sharp)
- add subtle wet rim at lower lid
Mouth/teeth
- don’t render every tooth equally
- emphasize silhouette teeth
- add saliva only if it supports the mood
8. The Concept Art Finish Stack (Repeatable)
A reliable finishing sequence:
- Value cleanup (Curves)
- Material separation (local contrast)
- Texture unification overlay (paper/grunge 5–15%)
- Focal sharpening (selective)
- Grain (subtle)
- Color grade (slight)
Exercises
- Render the same creature in 3 material variants:
- fur
- scales
- wet skin
- Keep silhouette identical. Train your material reads.
FAQ
How much detail is enough? If it reads at thumbnail and focal zones feel tactile, stop. More detail often makes it worse.
Next and Previous
- Previous: Creature Design Anatomy: Hybrid Reference, Believable Biology, and Functional Monsters
- Next: Character Design: From Silhouette to Story