Environments Advanced
Mist Pass in Blender: Z‑Depth Workflow for Atmospheric Perspective in Photoshop
P
Pixel Team 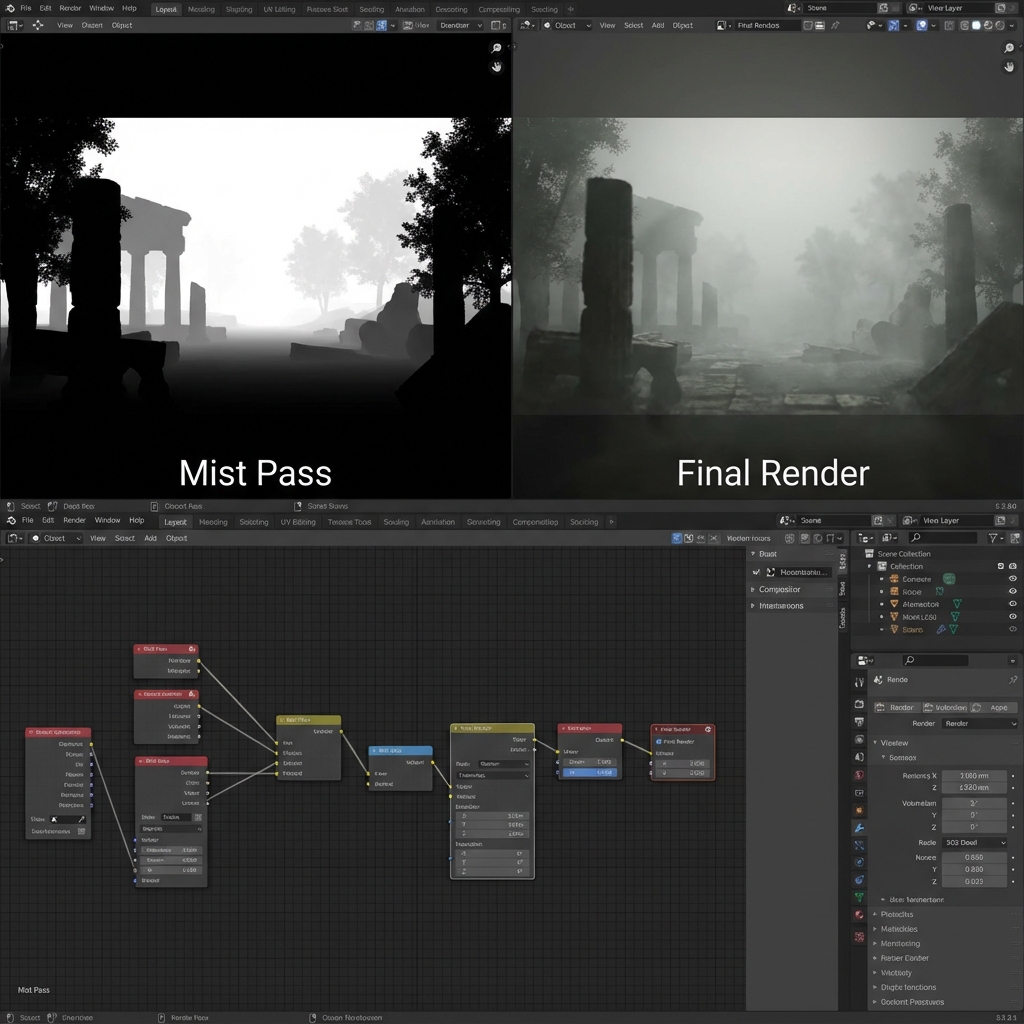
Painting fog by hand is slow and inconsistent. A Mist (Z‑Depth) pass gives you mathematical control over atmosphere—so you can separate foreground/midground/background instantly.
This workflow is a cornerstone of professional concept art, matte painting, and environment design.
1. What a Mist Pass Actually Is
A Mist pass is a grayscale depth map:
- Near = black (or white)
- Far = white (or black)
You can use it as a selection mask to:
- add fog
- reduce contrast in the distance
- push background hues toward the atmosphere
- grade depth layers separately
2. Enable and Configure Mist in Blender
Step-by-step
- Enable Mist Pass
View Layer Properties→ Passes → check Mist
- Set Mist Range
World Properties→ Mist Pass- Start: where mist begins
- Depth: where mist reaches full strength
- Falloff: controls curve of distribution
How to pick values (fast method)
- Put camera where you want it.
- Identify your furthest important object.
- Increase Depth until that object reads near-white in Mist.
3. Export the Mist Pass
Compositor export
- Open Compositing workspace.
- Check Use Nodes.
- Add a File Output node.
- Connect
Render Layers → Mistinto File Output. - Set format to PNG or OpenEXR.
- Render (
F12).
Recommendation: If you can, use OpenEXR for better depth precision.
4. Use Mist in Photoshop (The Pro Method)
Method A: Load as an Alpha Channel
- Open Mist image.
- Copy and paste into Channels as a new Alpha.
Ctrl/Cmd + Clickthe channel to load a luminosity selection.
Method B: Use as a Layer Mask
- Place Mist above your render.
- Create a fog/grade layer.
Alt/Option + Clickon mask and paste Mist into it.
5. High-Impact Uses (Do These First)
5.1 Fog that respects depth
- Create a new layer
- Choose atmosphere color (blue-grey, warm dust, etc.)
- Paint with large soft brush
- Mist mask automatically fades it with distance
5.2 Depth grading (instant cinematic look)
- Add Curves/Levels adjustment layer
- Use Mist as its mask
- Lower contrast in the distance
5.3 Depth color shift (atmospheric perspective)
- Add Color Balance/Selective Color
- Shift far distance toward sky hue
5.4 Push midground back without touching foreground
- Use Levels on the Mist mask to isolate midtones
6. Common Mist Pass Mistakes
- Mist range too short → everything turns white, no separation
- Mist range too long → no visible effect
- Fog too saturated → looks like colored smoke
- Fog everywhere → kills focal point contrast
Rule: Keep the focal point clearer than the background.
Exercises
- Render a simple scene with foreground rock, mid trees, far mountains.
- Create 3 moods using Mist:
- Morning haze
- Desert dust
- Cold fog
Conclusion
The Mist pass is one of the fastest ways to make a scene feel massive and cinematic. Once you master exporting and masking with Mist, you’ll grade depth like a professional matte painter—with total control.
Next and Previous
- Previous: Sci‑Fi Architecture in Blender: Greebles, Paneling, Arrays, Decals, and Scale Cues
- Next: Prop Design: Industrial Workflows in Blender